
The decorative overlay industry has grown exponentially over the last 10 years, and so has the number of failures and problems related to overlay installations. While I have seen the number of problems decrease more recently, there are still too many instances where an overlay is prescribed as a cure-all for anything even remotely considered a concrete problem.
The most important thing that I want to convey in this piece is that decorative overlays are NOT the answer to all concrete problems. In fact, in most cases, overlays are only as good as the surface they go down on.
Too often do I see projects where the overlay fails after a few months or years, only to discover that the substrate they were applied to was cracked, dirty, soaking wet or at the end of its life cycle.
Most decorative overlays require cracks to be repaired, the surface to be sound and clean and any moisture vapor transmission issues (MVT) be dealt with before the material is applied. Following a few basic guidelines on all overlay installations can go a long way to eliminating failures.
Surface preparation is the most important factor in any overlay application. Lack of proper surface preparation leads to the vast majority of the overlay issues I deal with. The most common “poor prep” issues usually consist of premature failure or delamination of the overlay from the substrate.
But what exactly is surface preparation? It is more than grinding or etching. It starts with a walk-through and an inspection of the surface. Questions that need to be forefront: What is the condition of the substrate? Are there cracks, and if so, how do they need to be treated? Does a crack suppression mat need to be used? Is any patchwork needed? What type of equipment will be needed to prep the floor? The physical preparation (grinding or otherwise) is the easy part, but often becomes all the focus.
When it comes to the actual physical work, I recommend mechanical preparation and not chemical treatments such as acid etching. By mechanical, I mean actually grinding or roughing up the surface. Be aware that using diamond grinding pads is not the same as using a diamond grinding wheel. I have seen 50-grit diamond pads actually start to tighten and smooth concrete, which is the exact opposite of what we are trying to accomplish.
I stay away from chemical treatments like acid etching because they are inconsistent, and unless you are using an industrial-grade acid that will burn through stainless steel, the store-bought stuff just does not do that much. Also, acid is nasty stuff to deal with, and the concrete must be neutralized with alkaline soap before moving on. (Baking soda is not an acceptable alternative.)
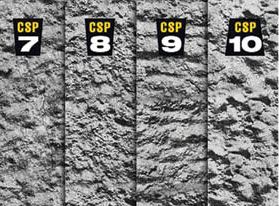
If the surface is not rough enough, the overlay will not have enough structure for proper adhesion. Poor adhesion leads to premature failure and delamination. To assure proper surface preparation, I use the Concrete Surface Profile Chip system from the International Concrete Repair Institute. This set of nine rubber molded plaques shows different concrete profile levels and how to achieve each profile. Surface preparation is actually quite simple – the surface must be clean and rough. The hard part, and where most installers fall short, is spending the time and money required to achieve the required profile and cleanliness.
Once the surface is prepared properly, overlay application can take place. It is very important to work within the limitations of the particular system you are using. If you are using a microtopping, applying it 3/4 inch to 1 inch thick is probably not a good idea. Thin-section microtoppings are designed to go down thin – hence the name “microtopping.” Applying these thin overlays too thick leads to shrinkage cracks and surface blisters. Trapped air and any gases created during mixing need to get to the surface before the material sets. A thicker cross-section of this material does not allow trapped air to get to the surface. If the air is trapped when the material gets hard, an air pocket (weak spot) is created.
The other downside to overapplication can be premature failure of the overlay, as these materials are not designed to handle excess thickness and weight.
The opposite holds true for thicker overlays like stampable and self-leveling systems. These typically need 1/4 inch of thickness to hold up long-term. They gain strength from thickness, and if underapplied, they will not hold up very long. A lesser-known problem with thicker overlays, especially stampable systems, occurs when the surface is finished too early or too aggressively. Just like with thin-section materials, air and gas created during mixing needs to get to the surface before the material sets. Overfinishing or putting on too tight of a finish too soon can result in blisters and weak spots occurring within the material. Once cured, these spots tend to fail, leading to pop-outs and divots.
This article would not be complete without mentioning priming, or in this case the lack of priming. A primer is an adhesion promoter. It allows a better bond to form between the substrate and the coating. They are common in the paint and coatings industry but don’t get the same respect and consideration in the concrete industry. While most overlays recommend or call for a primer, too often I see that critical step being skipped or given little attention.
That primer is very important for two reasons. First, it increases the bond strength between overlay and substrate, and second, it inhibits air and moisture movement from substrate to overlay. Note the many small blisters and air bubbles that form on the surface of microtopping overlays when applied to an unprimed surface. While I don’t recommend it, applying an overlay to a damp surface (where water is the primer) is usually better than applying to a bone-dry surface without any primer. Primers can be viewed as a cheap form of insurance that should be standard on all overlay applications.