 Adding sandblast stenciling to your repertoire lets you move up into high-profile commercial and residential projects. Rafco has introduced Brickform sandblast stencils to make this technique more accessible to contractors.
The growth of stenciling
Robert Freis, the president and owner of Rafco Products Brickform, realized the need for precut sandblast stencils several years ago after seeing the elaborate stenciled concrete work in some Las Vegas casinos. Back then, stencil material was laid out and tediously cut by hand. Freis realized that with the aid of design software and computer-controlled machinery, stencils could be made in a fraction of the time. Freis brought in Glen Roman to develop the company’s stenciling department and help customers design and use the stencils. Rafco unveiled Brickform Decorative Sandblast Stenciling at World of Concrete ’98, and the decorative concrete industry received the product eagerly.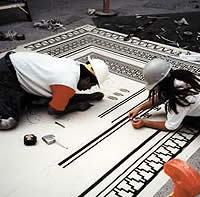
“Stenciling has become very popular with both landscape architects and decorative concrete contractors,” Roman says. “Architects see the design potential right away. They can create artistic concepts and incorporate them using regular concrete as their canvas. Stenciling can create decorative borders, logos, custom designs, or theme artwork-whatever they can dream up! Lately we’ve seen a dramatic increase of sandblast stenciling being specified on major commercial hardscape projects.”
“And,” Roman adds, “decorative concrete contractors can see that by adding stenciling to their existing services, they can bid on specialty or high-profile projects that they would have passed up before.”
What you’ll need
Getting into sandblast stenciling requires a sandblaster, of course. Small sandblasters that run off bottle-type compressors don’t have the capacity for large stenciling jobs. Most contractors rent a 185-cfm compressor and a 100-200-lb kettle sandblaster or shot blaster the day of the application.
 Most commercial stencil projects are done in the construction phase of the project, and in deference to other operations going on around you, you may need to use a Blast-Track machine or water-vapor sandblaster to control dust emissions.
As for the stencils themselves, you may be able to find the right one in Rafco’s selection of stock borders or medallions. If not, you can fax or mail the company an 81⁄2″ x 11″ black-and-white copy of your artwork, along with a rough drawing of the layout and dimensions of the project. The company will give you technical assistance if you need it. Rafco then sends you a proof of your stencil along with detailed dimensions of the design and layout. Once you approve the proof, Rafco calculates the price, cuts the stencil, and ships it out within a couple of days.
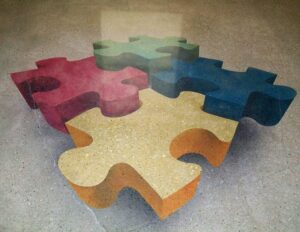
Stencils can be made as large or as small as you need. The panels are 26 inches wide and four or five feet long, and a larger medallion or design can be made by joining multiple panels like puzzle pieces.
Adding sandblast stenciling to your repertoire lets you move up into high-profile commercial and residential projects. Rafco has introduced Brickform sandblast stencils to make this technique more accessible to contractors.
 Design ideas
A good source for stencil designs for borders or medallions is your local bookstore or library. Look in the art section for clip-art books from Dover Publishing. In these books are thousands of copyright-free black-and-white designs that Rafco can enlarge to the size you need. In addition to all kinds of contemporary and vintage theme art, the books contain designs from many cultures, such as Celtic, Arabic, and Japanese art. Photocopy the best black-and-white image you can, the bigger the better, and avoid shaded designs.
 Applying the stencil
Most stenciling is done after the concrete is cured for 28 days. Overlays don’t require curing. The concrete may be integrally colored, stained, or colored with color hardener depending on the look desired for the overall design.
The first step, which is very important, is to apply a light coat of high-quality solvent-based wet-look sealer and let it dry thoroughly. The sealer gives the stencil adhesive a “skin” to stick to instead of porous concrete. Don’t use water-based sealer, as it may blister when you peel up the stencil.
Next, vacuum or blow off any dust or debris, then wipe the immediate area with isopropyl alcohol and allow it to dry. Allow 1⁄2 gallon of alcohol per 150 square feet of working area.
 The stencil is supplied between two Mylar sheets. The design is cut into the stencil, but the excess hasn’t been removed; it just looks like a continuous sheet. Without peeling off any backing sheets, lay the stencil down on the concrete in the exact position required, using chalk lines as guides. Using chalk or a grease pencil, make registration marks from the stencil to the floor, so you will be able to lay it down in exactly the same place.
 Now you’ll need a helper. Turn the stencil over and remove the clear film that covers the adhesive. Pull it back, not straight up. Carefully turn the stencil over again, keeping it suspended in the air. Lower one end to the concrete and adjust the stencil to match up with the registration marks. Then lay down the rest of the stencil, from one end to the other, aligning as you go. Get it right the first time, as pulling it up to realign it will weaken the adhesive.
 Once the material has been applied, make sure you have proper adhesion to the surface. Then remove the clear plastic that protects the top of the stencil, pulling it straight back as before. If the stencil wants to lift at the edges, which is normal, stop and press it back down while peeling back the Mylar.
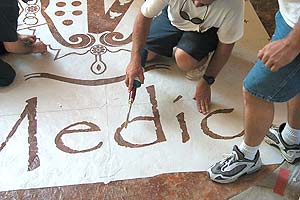
When the protective sheet is removed, use dental pick tools or razor knives to peel away the stencil material from the areas that should be open. Once the stencil design is revealed, it’s always a good idea to apply light to moderate heat to the surface using a propane torch. Assure adhesion as you warm the stencil by softly stepping on the material.
 Once your stencil is applied, mask off the surrounding area, and you’re ready to sandblast. Keep the nozzle about 12-18 inches from the surface, and keep it perpendicular to the surface, as blasting at an angle may peel up the stencil. Practice will establish the pressure and distance needed to create the desired effect.
After sandblasting, peel up the stencil. The material won’t leave any glue on the surface, so no cleanup is required. You can stain the etched areas if you want to; the sealer on the unetched areas acts as a barrier to the second color application. Then seal the surface.
Don’t rush
Allow plenty of time to prepare the surface and apply the stencil. “Most application problems stem from dirty job site conditions,” says Glen Roman. “The stenciling area should be absolutely clean! Any type of drywall or concrete dust on the application area will render the stencil unusable. Wiping down the surface with isopropyl alcohol will give you a nice dry tacky surface to apply your stencil to without affecting your sealer.”
 As you can see from this brief description, sandblast stenciling requires patience and attention to detail, but careful work will reward you with a nice-looking portfolio that will open the doors to the growing market for this kind of work. To help you get started, Rafco offers “deminars” through its distributors, who can also send someone to train your crew on-site at a job. For more information please call Rafco Brickform Products (800) 483-9628.
