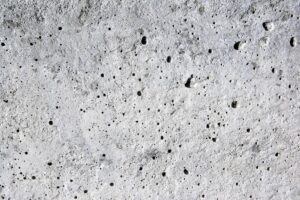
There are few things more frustrating about making concrete countertops than dealing with bug holes. They seem to always show up and are seemingly just about impossible to fill completely. You think you’ve got them all filled, only to have bug holes show up after final polishing.
They eat into your profits, cause fits by day and sleeplessness at night. It doesn’t matter if you’re wet-casting or casting GFRC. Chances are you’re going to have to deal with bug holes. The good news is that you can fill them completely in one step if you follow the procedures I’ve developed.
When you see a very small pinhole at the surface, you’re seeing the tip of the iceberg. When you set out to fill it, you’re trying to fill a large void through a very small opening.
It’s also going to be very tough to fill them completely in one pass by hand. You rub and rub, thinking they’re full, when in reality you’re only bridging the opening, which opens back up during final polishing.

Here’s how to power them shut.
The idea of powering bug holes shut came from one of my students. Ben Smith, of Hanover, Pa., was explaining how he fills holes while polishing floors. You mix the cutting dust with a liquid hardener and voila — the holes are filled while polishing. We figured that using a cementitious paste in lieu of the cuttings would work and it did.
You cannot fill a bug hole when it’s full of water. You’re trying to get material in the bug holes, the water’s trying to get out, and it just doesn’t work. Imagine trying to fill a wine bottle completely with grout when it’s already full of water. Allow your slab to dry before filling the bug holes, or use air to drive the water out of the holes.
CSA cement seems to have been invented to fill bug holes. It shrinks a lot less than portland cement and it sets a lot faster. I use a mixture of CSA cement, pigment as needed, and a 1 to 1 ratio of Acryl 60 and water.
You want to start with a very thin coat of grout, or else the grout will bridge the bug holes rather than filling them. I like to describe this idea as not losing touch with the slab. You should be able to see and feel the slab through the grout.
I use a variable-speed polisher with a 7-inch, 200-grit polishing pad. It’s important to use a polisher with enough power to turn the pad at a low speed without burning out the polisher. If you’re spraying grout onto your apron you’re going too fast. If the grout begins to dry out, spray a bit of water to keep it wet.
Your vision is the best judgment of when the holes are full. You can actually see the bug holes getting filled as you work the polisher over the tops. Fill the larger holes with your hand to speed things along. The polisher will force grout into the smaller holes. Allow the machine-applied thin coat of grout to set up slightly and trowel on a very thin topcoat if you have very large craters to fill. I’ve filled up to quarter-sized holes using this method.
I can fill the bug holes in 40 square feet of kitchen countertops in about 30 minutes using these techniques. That’s a far cry from the multiple passes I used to make by hand, and it’s a lot more thorough as well.
