Think of your concrete countertop business as a bucket you fill with water. You try to make as many sales as possible (in other words, put in lots of cups of water). You try to keep your price as high as possible and do large projects (use large cups). But, if the bucket is leaky, all of your efforts for concrete countertop profits are in vain.
How do these cost leaks occur? First, let’s look at what costs are involved in making concrete countertops. Besides overhead, there are material costs and labor costs.
Material costs for concrete are quite low. With from-scratch mixes, your concrete costs should be around $4 to $6 per square foot. Even when you add all consumables, such as forming materials, rubber gloves and diamond pads, your costs shouldn’t be much more than $10 per square foot. So optimizing material costs is not going to have much effect on your profitability.
Compare that to labor costs. You should be at about one man-hour per square foot for the whole process. If you have an employee who costs you $20 per hour including taxes and insurance, your labor costs are double to quadruple your material costs, even if you’re operating at optimum efficiency. Furthermore, labor costs can rapidly escalate any time you have a mistake, redo or callback. This is the biggest “leak” in a concrete countertop business. So how do you stop the leaking? Quality control.
A quality control checklist
There are so many details to keep track of with concrete countertops. Making any high-quality concrete requires care and precision, but casting countertops (or shower surrounds or fireplaces) requires attention to many details. By developing quality control procedures for all those details, you will ensure that your projects run more smoothly and you keep those labor costs down.
1. Templating
- Always template any piece that’s not completely free-standing. Corners are never square, walls are never straight, and nothing is ever built exactly to plan.
- Before you go out to a job site to template, require the project manager to sign off on a templating checklist, ensuring that all cabinets are fully installed, the job site is clear and accessible and all plumbing fixtures are on-site. That way, if you get to the job site and it is not ready, you can simply leave and assess the trip charge that is in your contract.
- Have a separate templating tool kit that contains absolutely everything you need — level, hot glue gun, extension cord, permanent markers, etc. Also, print a list of everything you need to take, so that you can double-check that you have everything before leaving for the job site.
- Use extreme care in templating, and note absolutely everything in various colors of permanent markers, especially the finished edges, cabinet seams and inside perimeter of sink cabinets.
- Place all the sinks and faucets inside the cabinets to make sure they will actually fit. Pay attention to windowsills that might interfere with faucets. Determine exactly where each fixture is going to go (for example, the soap dispenser on either the left or right side of the sink). Get the client’s approval of your plan.
- Make a sketch of the room that brings together all of this information, including any site considerations, such as stairs to be navigated.
- Take photos of the finished templates on top of the cabinets, so that if the cabinets are changed later, you can prove that your templates were correct.
2. Forming
- Think through where you are going to put any seams. It is extremely important to line up any seams with the cabinet seams (which is why you marked those on the templates). Be sure to get client approval for seams and their location.
- Make sure the templates are oriented correctly before you build the forms around them.
- Make sure that you put edge molding on the correct edges, and that it is oriented correctly (for example, that the molding in one edge is not upside down compared to the other edges).
- Use extreme care in creating and placing sink and faucet knockouts. Make sure you have specified whether undermount sinks will have an inside edge that is exactly flush, slightly larger or slightly smaller than the actual sink hole.
3. Mixing and casting
- Whether you’re mixing from scratch or using a bagged mix, use a scale to weigh everything, including water, as precisely as possible.
- Use a printed batch report and check off each item twice: once when you measure it and again as you add it to the mixer.
- Take care to ensure that corners and edges are filled completely, depending on your technique. For example, with GFRC, the mist-coat spraying process tends to spit out sand that collects in corners.
4. Processing and sealing
- Make sure the back side is flat before stripping the forms.
- Lay the templates on top of the slabs to double-check that they are correct.
- Put the faucets and sinks in the holes to double-check that they fit.
- When exposing aggregate, grind adjacent slabs together to ensure even thickness.
- After grouting, make sure there are no grout drips on the bottom edges of the countertops.
- If a bottom side is going to be visible from some vantage point in the room (such as the overhang of an island that is visible when you are climbing stairs), finish the bottom also.
- Check the color against the sample the client approved. If there is any difference, bring it to the client’s attention right away. Don’t just hope they’ll accept it when you show up to install.
- Depending on your sealer, there are many details to consider. Never apply a sealer to a client’s project if you haven’t practiced with it and tested it thoroughly. You want this final, critical step to go smoothly. Many high-performance sealers require multistep and even multiday processes.
5. Installation
- As with templating, require the site manager to sign off on a checklist that ensures the site is ready for installation and that nothing about the cabinets has changed (unless you specified something that needed to be fixed).
- As with templating, have a dedicated installation bag and a checklist. Don’t forget the plumbing fixtures! There are a lot more tools to bring for plumbing installation, so this checklist is particularly important.
- Transport slabs on edge, like sheets of glass. Flat slabs are more likely to crack from bumpy roads and potholes.
- Check the templates against the cabinets first. If anything has changed that apparently makes your slabs not fit, you can template again and charge for the redo, because you have photos proving that your first templates were correct.
- If all is well, scope out your route into the house, and place sawhorses along the way in case you need to set heavy slabs down to rest.
Each of these steps takes mere seconds or minutes, but they will save you many hours of work and prevent redos. Develop checklists and procedures for quality control and your business will flourish. This is especially important when you have employees. Experience is not easily transferable, but systems are.
Consider this scenario (a real-life example from an experienced concrete countertop maker): You formed a sink hole backwards and didn’t discover this until installation, and you had to redo the job.
Here are the consequences:
- Suppose this is a 50-square-foot kitchen and you have high material costs of $10 per square foot. That’s an extra $500 in materials.
- Suppose you have low labor costs of $20 per hour. That’s an extra $1,000 in labor.
- The job you had lined up right after this one got pushed back. This resulted in a loss of $5,000 in revenue for that month. You can never recover that revenue because you can’t turn back time.
- Total loss: $6,500
- Prevention of this loss, by using a checklist, would have taken just a few seconds.
Besides saving you tons of money, quality control will also make your life less stressful, help you present a professional image and result in happier clients. That, along with the increase in profitability of your concrete countertop business, makes quality control not only worthwhile, but also essential.
Important: sink hole size and client communication
 The manufacturer’s paper template that comes with an undermount sink usually specifies a hole that is slightly larger than the sink opening, resulting in a small step into the sink. To me, this defeats the purpose of an undermount sink, and most clients agree.
Our policy was to make the sink hole slightly smaller than the sink opening, resulting in no step and easy cleanup. We call this a negative reveal.
However, this backfired spectacularly on one project.
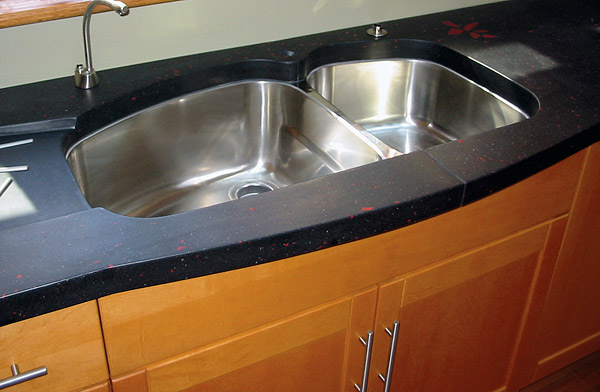
This particular client had a very expensive Franke sink with a deep, asymmetrical bowl design. We took possession of the sink at templating time and carefully created a beautiful, precise undermount sink opening with a custom drainboard. I remember going out into the shop to look at the completed countertop before installation and admiring the sink hole, saying, “Wow, this is the best undermount sink hole you’ve ever made. So smooth and even! Great job!”
Installation day, I got a phone call from the client, screaming and demanding his money back. He was furious because this Franke sink had a bevel on the inside lip, rather than a slightly rounded lip. By creating a negative reveal, we had covered this bevel.
We had to redo the project, all because the sink hole was 1/8 inch too small.
After that, we added a clause to the contract that stated all undermount sinks will have a negative reveal unless otherwise specified in the job description.
Even if that clause had been in the contract, we still should have noticed that there was something different about this sink and asked the client how he wanted to handle it. It would have taken 30 seconds and saved us thousands of dollars.
