In Pennsylvania, winter arrived early last year to deliver a one-two punch. A blast of frigid cold was followed swiftly by rain that froze fast to trees, driveways, sidewalks and anything else that didn’t have the ability, or sense, to get outta the way.
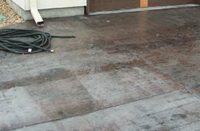
Thick ice accumulated everywhere as armies of municipal workers and homeowners toiled away on the front lines. Their weapons of mass destruction: salt, chemicals, plows and heavy ice blades. Alas, all those beautifully crafted, stamped, stained and sculpted concrete surfaces were chipped, cracked and chemically attacked.
But it doesn’t need to be that way. Your craftsmanship can be protected easily, and the home and business owners that you work for have the right to know about it. The answer is a technique that’s been hard at work indoors for years: radiant heat. It’s also a great companion to exterior concrete. Why not flick a switch and melt those blues and backaches away?
 Snowmelt technology is, essentially, radiant heat applied to outdoor surfaces. There are few differences between the two heating techniques, and both can be used to heat low- or high-mass concrete surfaces to melt ice and snow, keeping surfaces safe and clear of icy accumulations.
For decorative concrete surfaces — especially those that are stamped with a pattern — snowmelt technology works like a champ and preserves surface treatments intact. As you know all too well, snowmelt chemicals, solutions, salts, blades, scrapers and blowers can quickly take the finish off your best work.
“The key function of a snowmelt system is to keep walkways, driveways, and other areas dry and clear,” says Kolyn Marshall, system designer, Watts Radiant. “For commercial applications, especially those deemed critical areas, such as hospital and senior housing entry areas, helicopter pads and delivery ramps, radiant heat performs a valuable, perhaps lifesaving function.”
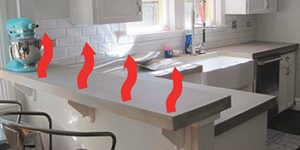
 Indoors, radiant floor heating works by using water-filled tubes or electric heating elements to warm the mass of a floor. The surface of the floor then gently emits energy that moves gracefully to all the objects in the room, making them — and your customer’s feet — cozy warm.
“Without question, warm floors are the most comfortable form of heat,” says Jim Lemen, HVAC/R markets manager, Vanguard Piping Systems. “The radiant heat from a floor will warm everything in a building, giving every surface an inviting sensation that can be felt. The floor becomes the warmest surface in a room, not the coldest.” Surprisingly, those surfaces most uncomfortable without radiant heat — concrete, stone and tile — become the most comfortable with radiant because they transfer the heat so well.
Whether hydronic or electric, radiant floor heat costs less to operate than any other form of heat. Because radiant floors offer more comfort at lower thermostat settings, most people find that they’re comfortable at lower room temperatures.
Indoor? Outdoor?
The use of decorative concrete is moving fast both indoors and out. Let’s take a look at the unique compatibility of radiant heat with those artfully crafted concrete surfaces that you know so well.
The most likely uses of decorative concrete inside a structure are for on-grade, high-mass slabs and finished basements, although today, due in great part to your selling efforts and the unique aesthetics of decorative concrete, there’s growing interest in suspended, thin-slab and lightweight concrete applications. Radiant heat has perhaps pushed the use of thin slabs faster than any other force.
All this and snowmelting too?
While considering, or recommending, a radiant heat system, look at the floor plan carefully to see if there might be a door, a sidewalk or a garage entrance that faces north or is exposed to ice and snow buildup. The home or building owner should be encouraged to ask the radiant designer to add one or more snowmelting zones onto the heating system.
 This entails moving a heated water/antifreeze solution from a heat exchanger attached to your space heating boiler or dedicated heat source underground to cold surfaces outside. You can activate snowmelting zones when the weather report calls for freezing precipitation, or simply wait for the microprocessor control to do the job.
For a snowmelt system, the designer specifies tubing embedded in outdoor or garage slabs. The designer must consider the influence of local weather, insulation, pipe spacing, pipe diameter and circuit length. PEX (cross-linked polyethylene) or EPDM synthetic rubber radiant tubing should have at least two inches of concrete over the top of the tubing. Usually, building codes provide exact measurements for this.
Snowmelting has several benefits. Icy surfaces are no longer a concern and maintenance-free. Facility maintenance costs are reduced because ice-melting chemicals aren’t required. These chemicals kill landscaping, increase building cleanup as they are tracked inside, and can degrade concrete and asphalt. Maintenance costs fall sharply.
And with today’s litigious society, snowmelts don’t cost money; they save it! The cost of the system is more than returned with one avoided lawsuit.
Hydronic systems
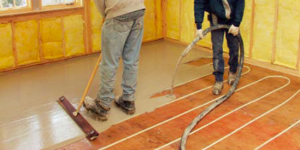
Hydronic (water-based) radiant floor systems are used in larger areas or for an entire home or building. Generally, hot water radiant is best suited for spaces of 500 square feet or more, or where hot water is already used as a heat source. Hydronic tubing can be embedded in concrete slabs, in thin-slabs over frame floors, stapled up between floor joists, or installed on top of the subfloor.
“Modern hydronic radiant heating systems use a closed loop design,” says Tim Doran, technical design manager, Wirsbo. Water is heated by a heat source — typically a boiler or water heater — and then circulated through the tubing to all areas of the building, or outside. Warmth is then delivered to each zone as thermostats call for it. “In a closed loop system, the water is permanently contained in the tubing so that it doesn’t blend with domestic water. Once it’s heated, then circulated throughout the radiant system, the same water returns to the heat source to be reheated and circulated again.”
Hydronic radiant floor heating operates on low pressure (usually below 20 psi) with temperatures often in the 90 to 150°F range.
PEX tubing is a great product for radiant heat and snowmelting applications. Some care must be taken to protect it from job-site puncture, crushing or exposure to the sun’s light. Another top candidate is Watts Radiant’s “Onix,” sturdy EPDM tubing that is more resistant to job-site abuse and UV radiation.
The system is the sum of its parts
Special distribution units, called manifolds, channel the heated liquid into multiple radiant floor pipe circuits. Manifolds are usually located close to the heated area, although they can be installed in a mechanical room. Each manifold set includes a supply (hot) and a return (cooler) manifold. Manifolds usually include balancing valves to control the flow of heated water to each circuit, or loop. Circuits are the loops of PEX or EPDM tubing that begin at the supply manifold and end at the return manifold. The combination of manifolds and circuits heat a defined area that’s called a zone. A zone can be one room or several.
One of the more interesting products for hydronic radiant is a high-tech, interlocking underlayment, Bekotec, made by Schluter. Studded polystyrene foam panels are placed directly over load-bearing substrate to isolate cracks and sound, and for thermal insulation. Radiant heat tubing is placed between a geometric pattern of “studs” that rise in the lower level.
Electric systems are another option
An electric system may be the best choice for small areas like a master bathroom. Of course, if electric energy is locally affordable, it could be used to heat, or provide floor warming, to an entire home or business. SunTouch is the leading supplier of mat systems for interior uses.
Delta-Therm sells a heavy electric cable product well suited to outdoor duty. For slabs, stairs and ramps, their snow melting cables are made from inorganic materials, so they don’t deteriorate with age. The cable assemblies are laid in a serpentine pattern, attached to reinforcing mesh prior to the concrete or asphalt pour. Because the cables are constant-watt, the ability to manipulate heat output on a square foot basis happens through cable spacing, usually at distances of 6 to 9 inches.
Where to get started?
It’s always best to involve the talents of a professional installer who knows and has experience with radiant heat, preferably a member of the Radiant Panel Association. You can then choose, with confidence, to what extent you’d be involved in the process.
Also, check the sites of the manufacturers listed at the end of this article. Interview a few professional installers: Be sure to ask if they belong to the RPA. Also visit one of the best sites in the industry. In this site, there’s a contractor locator to help you find a top firm.
