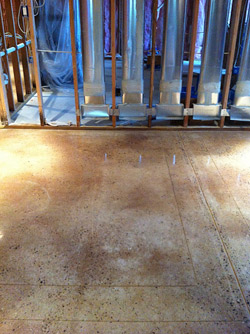
I was recently asked to troubleshoot issues on a polished concrete floor that failed to show vivid color, even after all the usual right steps were taken. It was “The Case of the Disappearing Color.”
Initial investigation revealed that this slab was new concrete and that it was porous. The polishers had found that applied densifier looked dry instantly, which they thought was a good sign that they could quickly move on to grinding and polishing.
However, what looks like “instant drying” of densifier is actually a red flag. When densifier penetrates that easily, it is actually penetrating too deeply and cannot properly harden the concrete at the surface. This is a real-life illustration of why densification “to rejection” — until the densifier stops being absorbed into the concrete and starts accumulating on top — is so important. When densifier penetrates immediately, we must densify to rejection. Or, we can reapply densifier after each diamond grit. Both of these approaches require thoughtful planning and adjustments to the overall installation.
Color will act the same way that densifier did on too-porous concrete. It will penetrate much too deeply instead of lying near the surface. Excessive porosity and penetration will kill the vivid and bright characteristics of the colorant.
Why the color vanished
Think of concrete as a big sponge. Some sponges are denser and have smaller pores, while some are softer and more absorbent. In this case, the concrete was excessively absorbent and also abrasive. Key indicators of high slab porosity include excessive dust or slurry, excessive wear on the diamonds, and chalky-looking concrete. Overly porous slabs will often suffer from more moisture vapor drive (movement) as well, which is a great concern when using either dyes or stains to color a concrete slab.
This concrete was in a residential basement. These slabs often have higher moisture vapor emission rates (MVERs) than a typical slab on grade.
What’s more, they are usually not finished by power trowel, so they tend to be less dense. Essentially, troweling mechanically densifies the surface by applying blade pressure, expelling water and air from within the surface paste. When the blade angle or pitch of a power trowel is progressively increased, the contact area between the blades and the floor surface decreases, resulting in more blade pressure and more compaction of the concrete surface.
In this case, the high MVER affected reactive stain. The acid stain did in fact react, but not before penetrating deeply into the concrete. This resulted in color locked within the slab instead of up at the surface. The intensity and vibrancy of the surface color was diminished and actually looked like it had simply disappeared. To complicate matters further, by the time I was contacted the job was already completed and the guard had already been applied, so any remediation would require working backwards.
There are many color options for polished concrete, some reactive and some nonreactive. Dyes are nonreactive and do not chemically lock the color into the slab, so they can be mobile in the presence of moisture vapor drive greater than 5 pounds per 1,000 square feet per 24 hours, or they can disappear in a slab with high alkalinity (a pH of 9 or greater). Dye mobility means that the color can travel to the surface where it can be mopped away, or it can sink more deeply into the concrete as moisture vapor emissions rise and fall.
Be aware of this and read your product data sheets. Then test or hope for the best!
Often, a dye or stain data sheet will recommend you perform a moisture content test on both newly poured and existing slabs. Slabs with moisture vapor drive of 5 pounds or les per 1,000/24 show best performance. High moisture levels or high alkalinity may affect performance of color.
How I solved the problem
I devised a plan to remedy the disappearing color in the basement. First, the guard would be removed. Second, color would be reapplied using a dye based in denatured alcohol, which is a better choice than acetone when there is a lack of sufficient ventilation and air exchange.
Once the desired color was achieved, the third step was to check the floor for water absorbency. If water on the floor absorbs and darkens the concrete, then additional densification is needed, and that means to rejection. In this case, water beaded so no additional densification was performed.
The fourth and final step — the guard application — is an area where many contractors cut corners. Applying a single coat and then lightly burnishing to complete projects on time and on budget will not give the floor proper protection. It may appear sealed, but with such a small amount of material applied, the performance will be short-term at best.
When a color intensity issue is evident, it is essential to apply multiple thin coats of guard and thoroughly burnish after each coat. Repeat until the surface looks and feels thoroughly sealed — this is not dependent upon a certain number of coats!
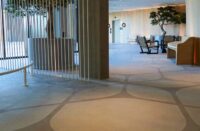
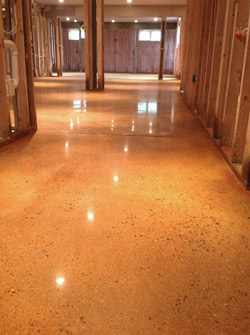
As with integrally colored concrete, a dyed or stained floor will show much more vivid color when completely sealed. After properly completing the remediation process, the “floor with the disappearing topical color” became much more vivid, intensely colored and glossy. The satisfied clients got the floor they expected.
Sort through the evidence
Beading water on concrete is normally due to the presence of silane or siloxane water repellents, an ingredient found in most guard products. Water repellents react with the silica in concrete, forming a strong bond beneath the surface.
The important point is that even when a guard is stripped from concrete, the water repellent often remains behind. If the final appearance of a floor is “iffy” and may or may not be in saleable condition, do not just apply guard in the hope that it will resolve the issues! Once guard is applied, a later fix is significantly more difficult, since water-based materials, including densifier, can no longer be applied effectively. If this caution is not taken, the best option may be to cut wet and start over again.
In The Case of the Disappearing Color, the initial topical colorant was acid stain and the fix was completed with a dye. Concrete polishing technologies, products and brands do not have to be mutually exclusive. When resolving an issue, think about all the different products that your company has used over the years. The fix may be in your inventory.
Contact your most supportive manufacturers. A technical expert at a manufacturer should know the ins and outs of the product well enough to advise you, even if they have never polished concrete.
Search the Web for similar situations. Ask yourself questions: What is different about this slab or job site or concrete mix design? Have you properly performed all your testing, including for moisture? Has something changed in your procedures?
Each situation will have unique features, but most slab problems stem from just a few common causes: high alkalinity, an increased percentage of fly ash or slag, an overtroweled or burned finish, and lack of curing. Some of the symptoms are lack of porosity, softness, chalkiness, efflorescence, moisture retention and high moisture drive.
The key is to figure out the problem scientifically. Be a detective, ask questions and sort through the evidence.

