It’s well-known that one of the best selling points of decorative concrete is its ability to mimic other materials with incredibly fidelity while still delivering the versatility, affordability and durability of concrete. Stamped and textured concrete is an area of decorative work where that quality really shines.
We reached out to some stamping and texturing veterans and collected the standout techniques below – an authentic travertine tile look, a classic cobblestone finish, and a hand-tooled brick-bordered patio. All would be welcome additions to any stamper’s playbook.

Brick Circle
Becker Architectural Concrete – Woodbury, Minn.
www.beckerconcrete.com
A soldier course of hand-tooled bricks puts this subtly textured technique over the top.
Ingredients
- Legacy Decorative Concrete Systems Colour-Hard: Sand (primary); Nutmeg, Brick Red, Terra Cotta (accents)
- Legacy DCS Accent Liquid Release
- Legacy DCS Accent Colour Release: Nutmeg
- Proline Seamless Texture Skins: Belgium Slate, Travertine
- W.R. Meadows Decra-Seal, with W.R. Meadows Sure-Step slip-resistant additive
- Special equipment: 8-inch hand chisel, homemade template/scribing tool set for marking a soldier course of 8-inch by 4-inch “bricks”
Directions
- Place a slab of natural gray, 4,000-psi concrete with 3/4-inch aggregate.
- Float the surface, and broadcast the Colour-Hard in Sand until you reach 80 percent coverage.
- By hand, chisel a border of soldier course bricks along the edges of your surface. (This technique looks great on patios, terraces and even stairs.) Using your template or scribing tool, cut an even course of 8-inch by 4-inch bricks.
- Mix 8 ounces of powdered release with 3 gallons of liquid release, and spray an even coat of the this mixture across the entire surface.
- Use the Travertine skins to texture the surface of your soldier course borders.
- Use Belgium Slate skins to texture the main fields.
- Once everything is textured, touch up brick joints with the chisel.
- Let surface cure overnight.
- The following day, pressure-wash the area to remove the colored release. However, don’t try to clean out every last bit of release from where it’s collected in the impressions of the textured surface – color left there will add depth.
- Apply your accent colors to the individual bricks in the soldier courses to create color variations, as desired.
- Finish the surface with two coats of sealer.
Cobbled Together
Colorado Hardscapes Inc. – Denver, Colo.
www.coloradohardscapes.com
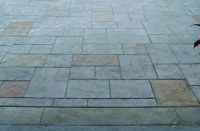
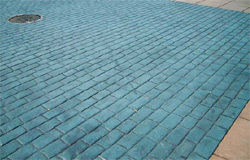
This cobblestone look is tidy and attractive, perfect for bringing some classic, old-world charm to a patio or walkway.
Ingredients
- Fritz-Pak Control Finish
- Bomanite imprinting tools: Running Bond Belgian Block
- Bomanite Color Hardener: Steel Blue
- Bomanite Release Agent: Cobblestone Gray
- Okon S-40 sealer
Directions
- Once you’ve placed a reinforced, 4,000-psi slab, bull float the entire surface.
- Using an airless sprayer, apply an even coat of Control Finish.
- Broadcast your color hardener across the surface and trowel it into the surface.
- Spray a second coat of Control Finish across the surface.
- Broadcast the release agent across the surface and stamp the surface using the imprinting tools.
- Carefully lift off stamping mats and let the surface cure overnight.
- Saw-cut your control joints the following day.
- After 2 to 3 days have gone by, power-wash the surface thoroughly to clean it, and once it’s dried, finish it with the sealer.
Totally Travertine
Proline Concrete Tools Inc. – Oceanside, Calif.
www.prolinestamps.com
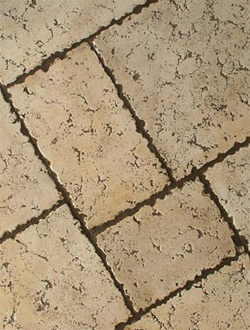
This grouted stamp technique delivers a finished surface that is nearly indistinguishable from actual travertine tiles.
Ingredients
- Proline Dura-Color Hardener: Adobe Beige
- Proline Dura-Liquid Release Agent
- Proline Stamps: Ashlar Versailles Tumbled Travertine
- Proline Dura-Color EZ-Accent Water-Based Acrylic Stains: Mission Brown, Pinto
- Proline Dura-Seal HG high-gloss sealer
- Sealer thinner (varies, depending on local code regulations)
- Sanded polymer-modified tile grout, neutral color
- EZ-Tique Water-Based Antiquing Wash: Walnut
Directions
- After placing concrete, broadcast an even layer of the Dura-Color hardener and work it into the surface with a float or trowel.
- Apply a thin coat of the liquid release agent and stamp the surface with the Ashlar Versailles Tumbled Travertine stamping tools.
- Once the concrete has cured, apply the Mission Brown and Pinto stains on a few of the stones to add accent color. To apply the stains, moisten the concrete with water and mist the stain with trigger sprayers onto the desired areas. Using a brush, rub the stain into the surface, which will leave the stones with a subtle, natural-looking hint of the accent color.
- After the stains have dried, applied a thin coat of sealer, diluted 1:1 with your sealer thinner.
- Once the sealer has dried, mix the grout and add EZ-Tique until you achieve the desired color, then grout the entire surface, including grout lines and surface texture. To apply the grout, use standard grouting techniques – use a sponge float to apply grout and then wipe clean with grout sponges.
- Once the grout dries, apply a coat of the high-gloss sealer and let dry.
